Kinect 2 for Windows Demo App
The Hands On Labs to complete a sample application for Windows 8.1 and the Kinect 2 for Windows
Kinect 2 Hands On Labs
 Lab 2: Displaying Infrared Data
Estimated Time to Complete: 20min
This lab is part of a series of hands on labs which teach you how to create a Windows 8.1 Store Application, using almost every available feature of the Kinect 2. This is the second lab in the series. In this lab you will learn how to retrieve the infrared feed from the Kinect sensor, and how to present the feed in xaml as an image.
This lab will explain the following:
- How to open the Infrared Frame Reader on the Kinect Sensor in code.
- How to receive the Infrared Frame when it is ready.
- How to convert the Infrared Frame data to a monochrome bitmap
- How to present the changing bitmap to xaml.
- How to get and present data about the status and resolution of the Kinect 2.
This lab comes with a starting point code solution and a completed code solution of the exercises.
Exercise 1 - Displaying the Infrared Frame
This exercise will teach you how to retrieve an infrared frame in a Kinect for Windows 2 application in Windows 8.1. This lab and all subsequent labs in this series are built using C# and assume you have a fundamental knowledge of the C# language.
To retrieve and use infrared frames from the Kinect 2, follow the steps below:
-
Open the existing Kinect 2 Sample solution in Visual Studio, or the copy you have from the end of the previous lab.
-
First you will open the Infrared Frame Reader in order to retrieve infrared data from the Kinect Sensor. Open the MainPage.xaml.cs file from the Solution Explorer. The code you write will set up the infrared feed, events, and data required, before opening the Kinect Sensor. When the Kinect starts delivering frames, you have something receiving the input. To explain the following code here is a description of the important variables:
- infraredFrameReader - Reader for infrared frames
- infraredFrameData - Intermediate storage for receiving frame data from the sensor
- infraredPixels - Intermediate storage for frame data converted to color pixels for display
- bitmap – The WritableBitmap which will replace the contents of an image in xaml
A new frame is received from the frame reader when it is ready, usually at about 30 frames per second. Each frame arrives as infrared data for every pixel of the camera resolution. This data is converted to a grayscale color range, in the infraredPixels. Then the infraredPixels are used to write to a bitmap object.
All these variables need to be initialized with the appropriate size, which is the size of the infrared frame coming from the Kinect 2.
To initialize these variables properly, copy the highlighted code below:
// ... other namespaces
using Windows.UI.Xaml.Media.Imaging;namespace Kinect2Sample { public sealed partial class MainPage : Page { // Size of the RGB pixel in the bitmapprivate const int BytesPerPixel = 4;private KinectSensor kinectSensor = null;private WriteableBitmap bitmap = null;//Infrared Frameprivate InfraredFrameReader infraredFrameReader = null;private ushort[] infraredFrameData = null;private byte[] infraredPixels = null;public MainPage() { // one sensor is currently supported this.kinectSensor = KinectSensor.GetDefault(); // get the infraredFrameDescription from the // InfraredFrameSourceFrameDescription infraredFrameDescription =this.kinectSensor.InfraredFrameSource.FrameDescription;// open the reader for the infrared framesthis.infraredFrameReader =this.kinectSensor.InfraredFrameSource.OpenReader();// wire handler for frame arrivalthis.infraredFrameReader.FrameArrived +=this.Reader_InfraredFrameArrived;// allocate space to put the pixels being // received and convertedthis.infraredFrameData =new ushort[infraredFrameDescription.Width *infraredFrameDescription.Height];this.infraredPixels =new byte[infraredFrameDescription.Width *infraredFrameDescription.Height * BytesPerPixel];// create the bitmap to displaythis.bitmap =new WriteableBitmap(infraredFrameDescription.Width,infraredFrameDescription.Height);// open the sensor this.kinectSensor.Open(); this.InitializeComponent(); } } } -
You should have noticed that there is an event handler which has been registered: the FrameArrived event from the infraredFrameReader. To handle to this event, write the following new method within the MainWindow class:
public sealed partial class MainPage : Page { // ...private void Reader_InfraredFrameArrived(object sender,InfraredFrameArrivedEventArgs e){bool infraredFrameProcessed = false;// InfraredFrame is IDisposableusing (InfraredFrame infraredFrame =e.FrameReference.AcquireFrame()){if (infraredFrame != null){FrameDescription infraredFrameDescription =infraredFrame.FrameDescription;// verify data and write the new infrared frame data // to the display bitmapif (((infraredFrameDescription.Width *infraredFrameDescription.Height)== this.infraredFrameData.Length) &&(infraredFrameDescription.Width ==this.bitmap.PixelWidth) &&(infraredFrameDescription.Height ==this.bitmap.PixelHeight)){// Copy the pixel data from the image to a // temporary arrayinfraredFrame.CopyFrameDataToArray(this.infraredFrameData);infraredFrameProcessed = true;}}}// we got a frame, convert and renderif (infraredFrameProcessed){ConvertInfraredDataToPixels();RenderPixelArray (this.infraredPixels);}}}Once a new frame arrives, this method extracts a single InfraredFrame from the FrameReference in the event arguments. Then the code checks that the frame is not null, and that it’s width, height, and data length are matching the usable bitmap that was initialized. The key line in this method is the infraredFrame.CopyFrameDataToArray(this.infraredFrameData) which copies the infrared frame into the infraredFrameData array class variable which is used in the next stage.
Finally, if that was successful, the infraredFrameProcessed bool is set to true and the next stage begins. The ConvertInfraredDataToPixels and RenderInfraredPixels methods will be created next.
-
Now the infrared data is in a readable array of ushort, you can convert each ushort to a pixel containing 4 values: Red, Green, Blue and Alpha. In this case the RGB will be duplicate to create a monochrome image, with alpha always at 255(opaque). The ushort coming from each pixel in the frame data will be a number from 0 to 65535 so there is some mathematical shaping which must occur to get these values into something in a scale from 0 to 255. To do this there are several const variables you must create at the top of the MainWindow class as below:
public sealed partial class MainPage : Page {/// <summary>/// The highest value that can be returned in the InfraredFrame./// It is cast to a float for readability in the visualization code./// </summary>private const float InfraredSourceValueMaximum =(float)ushort.MaxValue;/// </summary>/// Used to set the lower limit, post processing, of the/// infrared data that we will render./// Increasing or decreasing this value sets a brightness/// "wall" either closer or further away./// </summary>private const float InfraredOutputValueMinimum = 0.01f;/// <summary>/// The upper limit, post processing, of the/// infrared data that will render./// </summary>private const float InfraredOutputValueMaximum = 1.0f;/// <summary>/// The InfraredSceneValueAverage value specifies the/// average infrared value of the scene./// This value was selected by analyzing the average/// pixel intensity for a given scene./// This could be calculated at runtime to handle different/// IR conditions of a scene (outside vs inside)./// </summary>private const float InfraredSceneValueAverage = 0.08f;/// <summary>/// The InfraredSceneStandardDeviations value specifies/// the number of standard deviations to apply to/// InfraredSceneValueAverage./// This value was selected by analyzing data from a given scene./// This could be calculated at runtime to handle different/// IR conditions of a scene (outside vs inside)./// </summary>private const float InfraredSceneStandardDeviations = 3.0f;//... other private variables follow } -
Iterate through the infrared data and shape the values to a range of color. To do this, copy the new ConvertInfraredDataToPixels method below into the MainWindow class:
public sealed partial class MainPage : Page { // Reader_InfraredFrameArrived() before this...private void ConvertInfraredDataToPixels(){// Convert the infrared to RGBint colorPixelIndex = 0;for (int i = 0; i < this.infraredFrameData.Length; ++i){// normalize the incoming infrared data (ushort) to// a float ranging from InfraredOutputValueMinimum// to InfraredOutputValueMaximum] by// 1. dividing the incoming value by the// source maximum valuefloat intensityRatio = (float)this.infraredFrameData[i] /InfraredSourceValueMaximum;// 2. dividing by the// (average scene value * standard deviations)intensityRatio /=InfraredSceneValueAverage * InfraredSceneStandardDeviations;// 3. limiting the value to InfraredOutputValueMaximumintensityRatio = Math.Min(InfraredOutputValueMaximum,intensityRatio);// 4. limiting the lower value InfraredOutputValueMinimumintensityRatio = Math.Max(InfraredOutputValueMinimum,intensityRatio);// 5. converting the normalized value to a byte and using// the result as the RGB components required by the imagebyte intensity = (byte)(intensityRatio * 255.0f);this.infraredPixels[colorPixelIndex++] = intensity; //Bluethis.infraredPixels[colorPixelIndex++] = intensity; //Greenthis.infraredPixels[colorPixelIndex++] = intensity; //Redthis.infraredPixels[colorPixelIndex++] = 255; //Alpha}}}This method results in a byte array of color data stored in the infraredPixels[] class level variable, which contains the pixels colors to be rendered in the next step.
-
To get the pixels in the byte array into something xaml can use, it must be copied into a WritableBitmap object. Once it’s in a WritableBitmap, the frame can be used in xaml simply by linking the source of an Image in xaml to the bitmap class variable. To render the pixels to the bitmap, copy the method below:
public sealed partial class MainPage : Page {// ConvertInfraredDataToPixels() before this...private void RenderPixelArray (byte[] pixels){pixels.CopyTo(this.bitmap.PixelBuffer);this.bitmap.Invalidate();FrameDisplayImage.Source = this.bitmap;}}this.bitmap should have been created as a class level variable earlier when you were working on the initialization process, and the FrameDisplayImage is the image in the xaml which will be created next.
-
Open the MainPage.xaml file by double clicking it in the Solution Explorer or pressing Shift + F7 while the code behind is open. Add the following xaml within the main grid in the MainPage:
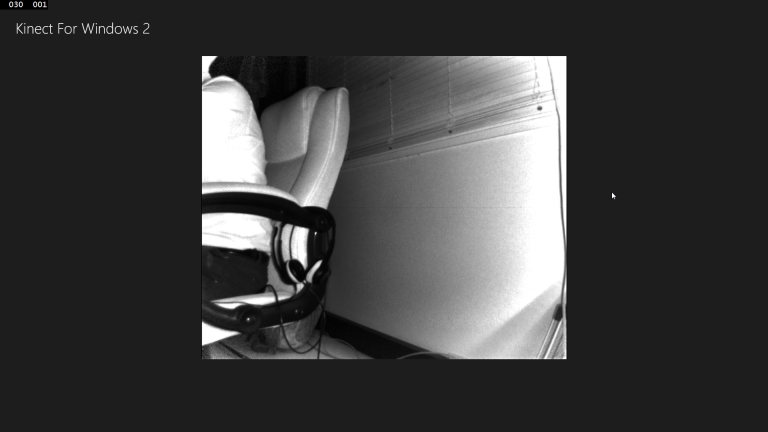
<Grid Background="{ThemeResource ApplicationPageBackgroundThemeBrush}"><Grid Margin="30"><Grid.RowDefinitions><RowDefinition Height="70"/><RowDefinition Height="*"/><RowDefinition Height="100"/></Grid.RowDefinitions><TextBlock Grid.Row="0"Style="{StaticResource SubheaderTextBlockStyle}"Text="Kinect For Windows 2"/><Image x:Name="FrameDisplayImage" Grid.Row="1"Stretch="Uniform"/></Grid></Grid> - Build and Run the application, it will start black, then after a second the Kinect 2 will switch on and present the infrared frame!
For fun, try turning the lights off. Infrared light is invisible to humans and so the camera works even in complete darkness, this is the basis of how night vision works.
-
As an optional task, try altering the const values which were set in step 4 of this exercise and see the difference they make in the resulting frame output. You will see the visibility depth and brightness of the image change depending on these values.
Lab 2: Displaying Infrared Data
This exercise will show you how to present useful debugging data about the current Infrared Frame and also the current status of the Kinect. This exercise will aid you with troubleshooting any problems with the Kinect later, and to highlight the resolution difference between frames in the next exercises.
To retrieve and display frame data from the Kinect 2, follow the steps below:
- Firstly, you may have noticed that the Designer when viewing xaml is not available when building for x64 architectures.
That’s fine because Kinect 2 is also compatible with x86 architecture, which you can switch to now:
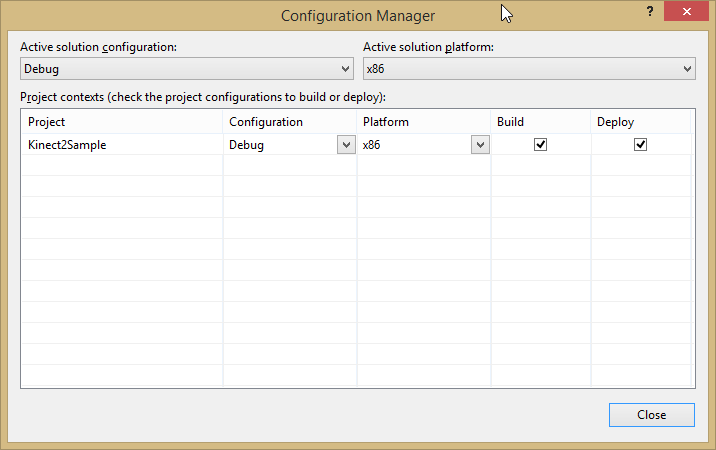
- Click BUILD then Configuration Manager… to open the Configuration Manager.
- Click the dropdown box under Active Solution Platform: and select x86.
- Click Close.
- Now open the project properties by right Clicking the Kinect2Sample project in the solution explorer, then clicking Properties.
- Click the Build tab on the left, then beside Platform: select x86 from the dropdown.
- Click FILE, then Save All or hit Ctrl + Shift + S to save all files.
- Build and Run the application to check for errors.
- The things you should focus on are the status of the Kinect (if it is responding or not) and the current resolution of the frame (which is interesting now, and later on when the lab changes frame type). It is easy enough to get these values in code behind. To enable the xaml to bind to the status values, if they change, you must implement the INotifyPropertyChanged interface in the MainPage class. Then the code will fire the property changed event when the status changes, and when the frame description changes. To set this up, first copy the following highlighted code in the relevant sections of the MainPage class to initialize and use changeable properties:
- Now you can use these properties in code. Whenever the StatusText or CurrentFrameDescription is set, the PropertyChanged event will fire and notify the xaml that it has changed, which refreshes the binding. To use these properties and get the status and resolution, copy the highlighted code below:
- Finally, Open the MainPage.xaml and create some TextBlocks for labels, and TextBlocks for binding to the properties in the code behind MainPage.xaml.cs. When you do this you may notice that the xaml designer updates the design view as you write the code because earlier you switched to x86. Copy the highlighted code below:
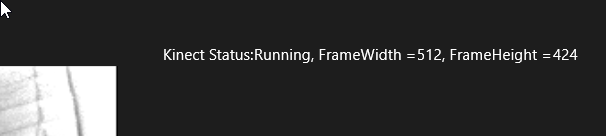
- Build and Run the application, and in the top right, the Status of the Kinect 2 is visible and the frame description shows the original resolution of the frame!
using System.ComponentModel;namespace Kinect2Sample { public sealed partial class MainPage : Page, INotifyPropertyChanged{ // ... consts and other private variables... private KinectSensor kinectSensor = null;private string statusText = null;private WriteableBitmap bitmap = null;private FrameDescription currentFrameDescription;//Infrared Frame variables...public event PropertyChangedEventHandler PropertyChanged;public string StatusText{get { return this.statusText; }set{if (this.statusText != value){this.statusText = value;if (this.PropertyChanged != null){this.PropertyChanged(this, newPropertyChangedEventArgs("StatusText"));}}}}public FrameDescription CurrentFrameDescription{get { return this. currentFrameDescription; }set{if (this. currentFrameDescription!= value){this. currentFrameDescription = value;if (this.PropertyChanged != null){this.PropertyChanged(this, newPropertyChangedEventArgs("CurrentFrameDescription"));}}}}// ... } }
public MainPage()
        {
	    // ...
            // create the bitmap to display
            this.bitmap = new WriteableBitmap(infraredFrameDescription.Width,
 		infraredFrameDescription.Height);

            this.CurrentFrameDescription = infraredFrameDescription;

            // set IsAvailableChanged event notifier
            this.kinectSensor.IsAvailableChanged +=
                this.Sensor_IsAvailableChanged;

            // use the window object as the view model in this example
            this.DataContext = this;

            // open the sensor
            this.kinectSensor.Open();

            this.InitializeComponent();
        }

        private void Sensor_IsAvailableChanged(KinectSensor sender,
 		IsAvailableChangedEventArgs args)
        {
            this.StatusText = this.kinectSensor.IsAvailable ?
                 "Running" : "Not Available";
        }
            <TextBlock Grid.Row="0" Style="{StaticResource SubheaderTextBlockStyle}"
                       Text="Kinect For Windows 2"/>
            <StackPanel Grid.Row="0" Orientation="Horizontal"
                        HorizontalAlignment="Right"
                        VerticalAlignment="Bottom">
                <TextBlock Text="Kinect Status:  "/>
                <TextBlock Text="{Binding StatusText}"/>
                <TextBlock Text=", FrameWidth =  "/>
                <TextBlock Text=
                    "{Binding CurrentFrameDescription.Width}"/>
                <TextBlock Text=", FrameHeight =  "/>
                <TextBlock Text=
                    "{Binding CurrentFrameDescription.Height}"/>
            </StackPanel>
            <Image x:Name="FrameDisplayImage" Grid.Row="1" Stretch="Uniform"/>
Try unplugging the Kinect and see the status change. Then if you plug the Kinect back in, the status will update and the feed will come back.
Summary
This lab has taught you how to retrieve and use an infrared frame from the Kinect 2 device, and use that frame data to make a visible bitmap to be displayed in xaml.
It is interesting to note that most of this process is manual. The data from the InfraredFrame is not usable until it’s converted to a bitmap. This is by-design as there are many uses of infrared light beyond converting it to a visible image. The Kinect 2 uses the infrared camera to calculate known bodies and shapes in low light conditions. That is why the resolution of the InfraredFrame is so low: it matches the resolution seen by the DepthFrame to calculate what is and isn’t a person.
In the next lab, you will see the resolution difference between the ColorFrame and the InfraredFrame now that you have displayed the frame data in xaml.
There is code available which is the completed code solution of the work in this lab. The next lab will begin from this code.