Kinect 2 for Windows Demo App
The Hands On Labs to complete a sample application for Windows 8.1 and the Kinect 2 for Windows
Kinect 2 Hands On Labs
 Lab 3: Displaying Color Data
Estimated Time to Complete: 20min
This lab is part of a series of hands on labs which teach you how to create a Windows 8.1 Store Application which uses almost every available feature of the Kinect 2. This is the third lab in the series, and it describes how to get the color feed from the Kinect sensor, as well as the Infrared feed from the previous lab.
This lab will explain the following:
- How to open the Multi Source Frame Reader on the Kinect Sensor in code.
- How to receive the Multi Source Frame when it is ready.
- How to receive the Multi Source Frame when it is ready.
- How to get the currently selected frame type from the Multi Source Frame.
- How to convert the Color Frame data to a color bitmap
This lab comes with a starting point solution and a completed solution of the covered exercises if required.
Exercise 1 - Displaying the Color Frame
This exercise will teach you how to retrieve a color frame in a Kinect for Windows 2 application for Windows 8.1. This lab and all subsequent labs in this series are built using C# and assume you have a fundamental knowledge of the C# language.
The screenshots in this lab are from Visual Studio Pro 2013 Update 2, Community Edition is identical.
This lab builds upon the previous lab, which integrated an infrared frame reader. This lab will allow the user to switch between feeds in the user interface. Switching frames or using multiple kinds of frames for anything requires a new kind of frame reader: the MultiSourceFrameReader, which will give you both the color and infrared feeds.
To retrieve and use color frames from the Kinect 2 using the MultisourceFrameReader, follow the steps below:
-
Open the existing Kinect 2 Sample solution in Visual Studio, or the copy you have from the end of the previous lab.
-
Create an enum to define the currently selected frame type. Open the MainPage.xaml.cs file from the Solution Explorer. The code will now need to handle both color and infrared frames, so you must make sure that each frame type is initialized with the appropriate size. First, create the new enum, then make a const variable which is the default frame type, finally make a class level variable which will store the current choice. Copy the following highlighted code to do this:
namespace Kinect2Sample {public enum DisplayFrameType{Infrared,Color}public sealed partial class MainPage : Page, INotifyPropertyChanged {private const DisplayFrameType DEFAULT_DISPLAYFRAMETYPE =DisplayFrameType.Color;//...private FrameDescription currentFrameDescription;private DisplayFrameType currentDisplayFrameType;//... } } -
You can use the currently selected state to initialize the bitmap with the right size. Create a new method to do this, called SetupCurrentDisplay(). In the MainPage constructor, remove all the code which initialized the InfraredFrame, it will move to the SetupCurrentDisplay method. Then add the the new code to setup the ColorFrame. To do this copy the highlighted code below:
public MainPage() { // one sensor is currently supported this.kinectSensor = KinectSensor.GetDefault();SetupCurrentDisplay(DEFAULT_DISPLAYFRAMETYPE);// open the reader for the infrared frames this.infraredFrameReader = this.kinectSensor.InfraredFrameSource.OpenReader(); //... }private void SetupCurrentDisplay(DisplayFrameType newDisplayFrameType){currentDisplayFrameType = newDisplayFrameType;switch (currentDisplayFrameType){case DisplayFrameType.Infrared:FrameDescription infraredFrameDescription =this.kinectSensor.InfraredFrameSource.FrameDescription;this.CurrentFrameDescription = infraredFrameDescription;// allocate space to put the pixels being// received and convertedthis.infraredFrameData =new ushort[infraredFrameDescription.Width *infraredFrameDescription.Height];this.infraredPixels =new byte[infraredFrameDescription.Width *infraredFrameDescription.Height * BytesPerPixel];this.bitmap =new WriteableBitmap(infraredFrameDescription.Width,infraredFrameDescription.Height);break;case DisplayFrameType.Color:FrameDescription colorFrameDescription =this.kinectSensor.ColorFrameSource.FrameDescription;this.CurrentFrameDescription = colorFrameDescription;// create the bitmap to displaythis.bitmap =new WriteableBitmap(colorFrameDescription.Width,colorFrameDescription.Height);break;default:break;}}The InfraredFrame initialization logic here is the same as in the previous lab. The ColorFrame does not need an array for the data, or an array for its pixels, so it simply sets the bitmap to the right resolution matching the colorFrameDescription.
-
Next replace the InfraredFrameReader with a MultisourceFrameReader to switch between frame types. A new class variable is needed for the MultiSourceFrameReader, and it needs to be initialized in the MainPage constructor. To do this, copy the highlighted code below (also remove the references to the infraredFrameReader as they are no longer necessary):
private DisplayFrameType currentDisplayFrameType;private MultiSourceFrameReader multiSourceFrameReader = null;//Infrared Frame private ushort[] infraredFrameData = null; //... public MainPage() { // one sensor is currently supported this.kinectSensor = KinectSensor.GetDefault(); SetupCurrentDisplay(DEFAULT_DISPLAYFRAMETYPE);this.multiSourceFrameReader =this.kinectSensor.OpenMultiSourceFrameReader(FrameSourceTypes.Infrared | FrameSourceTypes.Color);this.multiSourceFrameReader.MultiSourceFrameArrived +=this.Reader_MultiSourceFrameArrived;// set IsAvailableChanged event notifier this.kinectSensor.IsAvailableChanged += this.Sensor_IsAvailableChanged; // use the window object as the view model in this simple example this.DataContext = this; // open the sensor this.kinectSensor.Open(); this.InitializeComponent(); }private void Reader_MultiSourceFrameArrived(MultiSourceFrameReader sender,MultiSourceFrameArrivedEventArgs e){}The MultiSourceFrameReader is initialized with the FrameSourceTypes which will be used, so it is important to remember that to add new frame types, the MultiSourceFrameReader must be created appropriately.
Please make sure to remove the previous InfraredFrameReader from the MainPage constructor. -
The MultiSourceFrameReader works in a similar way to the InfraredFrameReader in that it raises an event when a new frame is ready. The difference is that the MultiSourceFrameReader carries frames of many types, depending on its construction. The frame types within the MultiSourceFrameReader are extracted through a multiSourceFrame, which contains each specific frame. The Reader_MultiSourceFrameArrived() method will extract these frames, to be used in other methods. To do this copy the code below:
private void Reader_MultiSourceFrameArrived(MultiSourceFrameReader sender, MultiSourceFrameArrivedEventArgs e) {MultiSourceFrame multiSourceFrame = e.FrameReference.AcquireFrame();// If the Frame has expired by the time we process this event, return.if (multiSourceFrame == null){return;}switch (currentDisplayFrameType){case DisplayFrameType.Infrared:using (InfraredFrame infraredFrame =multiSourceFrame.InfraredFrameReference.AcquireFrame()){ShowInfraredFrame(infraredFrame);}break;case DisplayFrameType.Color:using (ColorFrame colorFrame =multiSourceFrame.ColorFrameReference.AcquireFrame()){ShowColorFrame(colorFrame);}break;default:break;}}As you can see, this method reacts to the currentDisplayFrameType to perform different actions with the frame received. ShowInfraredFrame and ShowColorFrame are new methods which will be created next.
-
ShowInfraredFrame is similar to the Reader_InfraredFrameArrived method in the previous lab. The difference is that the method now receives the frame as a parameter. Copy the new method below, you could also refactor the old method to look like this new one:
private void ShowInfraredFrame(InfraredFrame infraredFrame){bool infraredFrameProcessed = false; if (infraredFrame != null) { FrameDescription infraredFrameDescription = infraredFrame.FrameDescription; // verify data and write the new infrared frame data to the display bitmap if (((infraredFrameDescription.Width * infraredFrameDescription.Height) == this.infraredFrameData.Length) && (infraredFrameDescription.Width == this.bitmap.PixelWidth) && (infraredFrameDescription.Height == this.bitmap.PixelHeight)) { // Copy the pixel data from the image to a temporary array infraredFrame.CopyFrameDataToArray(this.infraredFrameData); infraredFrameProcessed = true; } } // we got a frame, convert and render if (infraredFrameProcessed) { this.ConvertInfraredDataToPixels(); this.RenderPixelArray(this.infraredPixels); }} -
Now you can create the ShowColorFrame method. This method takes the color data from the frame and copies it to the bitmap which is used in the xaml. Depending on which frame types the multiSourceFrameReader is set up to retrieve, the colorFrame may arrive with a different colorFormat to Bgra, in this case it is formatted before it is copied into the bitmap. Copy this new method as below:
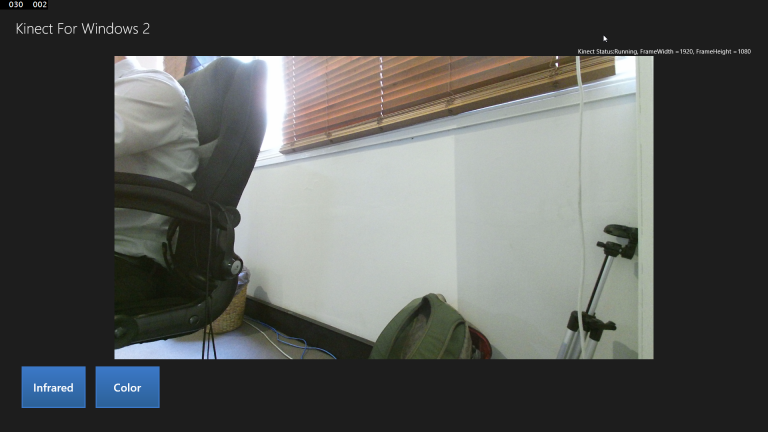
private void ShowColorFrame(ColorFrame colorFrame){bool colorFrameProcessed = false;if (colorFrame != null){FrameDescription colorFrameDescription =colorFrame.FrameDescription;// verify data and write the new color frame data to// the Writeable bitmapif ((colorFrameDescription.Width ==this.bitmap.PixelWidth) &&(colorFrameDescription.Height == this.bitmap.PixelHeight)){if (colorFrame.RawColorImageFormat == ColorImageFormat.Bgra){colorFrame.CopyRawFrameDataToBuffer(this.bitmap.PixelBuffer);}else{colorFrame.CopyConvertedFrameDataToBuffer(this.bitmap.PixelBuffer,ColorImageFormat.Bgra);}colorFrameProcessed = true;}}if (colorFrameProcessed){this.bitmap.Invalidate();FrameDisplayImage.Source = this.bitmap;}} - Build and Run the application to make sure there are no errors. The application should show the new color frame as it is set to the DEFAULT_DISPLAYFRAMETYPE.
-
Next you will add some buttons to the xaml which will allow the user to switch the currentDisplayFrameType and therefore change the frame retrieved and the resulting bitmap. Open the MainPage.xaml file by double clicking it in the Solution Explorer or pressing Shift + F7 while the code behind is open. Add the following xaml within the main grid in the MainPage (there is a simple button style also):
<Page x:Class="Kinect2Sample.MainPage" xmlns="http://schemas.microsoft.com/winfx/2006/xaml/presentation" xmlns:x="http://schemas.microsoft.com/winfx/2006/xaml" xmlns:local="using:Kinect2Sample" xmlns:d="http://schemas.microsoft.com/expression/blend/2008" xmlns:mc="http://schemas.openxmlformats.org/markup-compatibility/2006" mc:Ignorable="d"><Page.Resources><LinearGradientBrush x:Key="ButtonGradientBrush"StartPoint="0,0" EndPoint="0,1" ><GradientStopCollection><GradientStop Offset="0.0" Color="#3B78C8"/><GradientStop Offset="1.0" Color="#2C6199"/></GradientStopCollection></LinearGradientBrush><SolidColorBrush x:Key="ButtonBorderBrush" Color="#3B78C8"/><Style x:Key="FrameSelectorButtonStyle" TargetType="Button"><Setter Property="Background"Value="{StaticResource ButtonGradientBrush}"/><Setter Property="BorderBrush"Value="{StaticResource ButtonBorderBrush}"/><Setter Property="BorderThickness" Value="2"/><Setter Property="Padding" Value="12,4,12,4"/><Setter Property="Width" Value="120"/><Setter Property="Height" Value="80"/><Setter Property="Margin" Value="6"/><Setter Property="FontSize" Value="20"/></Style></Page.Resources><Grid Background="{ThemeResource ApplicationPageBackgroundThemeBrush}" > <Grid Margin="30"> <!--...--> <Image x:Name="FrameDisplayImage" Grid.Row="1" Stretch="Uniform"/><ScrollViewer Grid.Row="2"ScrollViewer.HorizontalScrollBarVisibility="Auto"ScrollViewer.VerticalScrollBarVisibility="Auto"><StackPanel Orientation="Horizontal"><Button Content="Infrared" Style="{StaticResourceFrameSelectorButtonStyle}"Click="InfraredButton_Click"/><Button Content="Color" Style="{StaticResourceFrameSelectorButtonStyle}"Click="ColorButton_Click"/></StackPanel></ScrollViewer></Grid> </Grid> </Page>Two new buttons should appear on the bottom row of the app, which are Infrared and Color, both with click events attached.
- Finally, respond to the click event from the buttons to change the currentDisplayFrameType using the SetupCurrentDisplay() method.
Open the MainPage.xaml.cs and add the following two event handler methods:
private void InfraredButton_Click(object sender, RoutedEventArgs e) { SetupCurrentDisplay(DisplayFrameType.Infrared); } private void ColorButton_Click(object sender, RoutedEventArgs e) { SetupCurrentDisplay(DisplayFrameType.Color); } - Build and Run the application. Press the buttons to switch feeds!
Summary
This lab taught you how to retrieve and use an infrared frame and a color frame from the MultiSourceFrameReader. You then use that frame data to create a visible bitmap which isrendered in xaml. You also enabled the user to switch between the two feeds with buttons.
You should have noticed the difference in resolution between the ColorFrame and the InfraredFrame. The ColorFrame is 1920 by 1080 (HD) while the InfraredFrame is 512 by 424. The color feed is expected to be used more for visualizing the current scene for users, and for this reason it is given a much higher resolution. A high resolution color feed means full screen applications can look great on any modern HD television.
In the next lab, you will implement a new feed into the application, the DepthFrame.
There is code available which is the completed solution from the work in this lab. The next lab will begin from this code.