Kinect 2 for Windows Demo App
The Hands On Labs to complete a sample application for Windows 8.1 and the Kinect 2 for Windows
Kinect 2 Hands On Labs
 Lab 6: Displaying Body Data
Estimated Time to Complete: 20min
This lab is part of a series of hands on labs which teach you how to create a Windows 8.1 Store Application using almost every available feature of the Kinect 2. This is the sixth lab in the series, and it teaches you how to use the body feed from the Kinect to render a skeleton for each of the bodies in a scene.
This lab will explain the following:
- How to get the BodyFrame from the Kinect.
- How to use to CoOrdinateMapper to map the body joint positions.
- How to use a predefined class to create a skeleton of the body and draw it using simple XAML shapes.
This lab comes with a starting point code solution and a completed code solution of the exercises.
Exercise 1 - Displaying the Body Data
This exercise will teach you how to display body data as colored joints and bones in a Kinect for Windows 2 application for Windows 8.1. This lab, and all subsequent labs in this series, are built using C# and assume you have a fundamental knowledge of the C# language.
The screenshots here are from Visual Studio Pro 2013 Update 2 but Community Edition is identical.
This lab builds upon the previous lab, which integrated the Body Mask through the multi-source frame reader. There are 2 new code files in this lab, called BodiesManager.cs and BodyInfo.cs. They are included in the completed code for this lab, and can be copied as-is.
You have seen how the co-ordinate mapper can help you discern which pixels in a color image are part of a body, yet there is much more body data in the Kinect than just the BodyIndexFrame. The Body Frame contains all joint and orientation information about up to six known bodies in the view of the Kinect. Most games use this joint information to position game assets or manipulate a model using the joints of a player.
There are 25 joints mapped for each body, each one has a position and orientation. This exercise creates bones from those joints by storing each joint as a pair and the bone is simply a starting and ending point. Then these bones and joints are drawn to a canvas using simple XAML ellipses and lines. This is the first exercise which does not result in rendering a bitmap and it should help you understand that a good Kinect experience does not have to show the live color feed. An application can use shapes and assets to express the same data.
To draw bodies from the Kinect 2 using the MultisourceFrameReader, follow the steps below:
-
Open the existing Kinect 2 Sample solution in Visual Studio, or the copy you have from the end of the previous lab.
-
To begin, add the new code files to be used in this exercise: the BodiesManager.cs and the BodyInfo.cs files are located with the Kinect2Sample.csproj file in the completed project. To add these files, copy them into your working directory in Windows, then Right Click the project in the Solution Explorer, select Add , then Existing Item… then select the local versions of BodyInfo.cs and BodiesManager.cs and Click the Add button.
The BodiesManager class is responsible for organizing and drawing all the tracked bodies in a frame. There is a lot of rendering code to render the joints in this class. This is constructed with a co-ordinate mapper to get the joints in 2D space, and a canvas on which to draw. This class also draws rectangles at the edges where a body is extending outside the cameras field of view.The BodyInfo class provides storage of all the joint and bone information obtained from a body to couple the joint information with graphical information like ellipses and color.
-
Add a new DisplayFrameType to the enum, then an instance of the BodiesManager class. Open the MainPage.xaml.cs file from Solution Explorer. Copy the following highlighted code to do this:
namespace Kinect2Sample { public enum DisplayFrameType { Infrared, Color, Depth, BodyMask,BodyJoints} public sealed partial class MainPage : Page, INotifyPropertyChanged { //... private MultiSourceFrameReader multiSourceFrameReader = null; private CoordinateMapper coordinateMapper = null;private BodiesManager bodiesManager = null;//... //BodyMask Frames private DepthSpacePoint[] colorMappedToDepthPoints = null;//Body Joints are drawn hereprivate Canvas drawingCanvas;public event PropertyChangedEventHandler PropertyChanged; //... } } -
To use the BodyManager you must initialize a canvas on which to render in xaml. Open the MainPage.xaml. Under the Image (FrameDisplayImage) in the xaml add a new canvas within a view box (so it stretches to the size of the available space). To do this copy the highlighted code below:
-
You already have the SetupCurrentDisplay method which is called every time the current display changes, and that’s where the initialization logic for the body belongs. There is a switch statement which uses the currentDisplayFrameType to determine what to initialize and the size of the bitmap. This doesn’t use the bitmap, and instead you render shapes to a canvas. You also have to set the FrameDisplayImage and BodyJointsGrid to display nothing by default. You will then set the various render styles later. This prevents the xaml elements from rendering on top of one another. You can add a new case for the BodyJoints in this switch statement. To do this, copy the highlighted code below:
private void SetupCurrentDisplay(DisplayFrameType newDisplayFrameType) { currentDisplayFrameType = newDisplayFrameType; // Frames used by more than one type are declared outside the switch FrameDescription colorFrameDescription = null;// reset the display methodsif (this.BodyJointsGrid != null){this.BodyJointsGrid.Visibility = Visibility.Collapsed;}if (this.FrameDisplayImage != null){this.FrameDisplayImage.Source = null;}switch (currentDisplayFrameType) { case DisplayFrameType.Infrared: //... break; case DisplayFrameType.Color: //... break; case DisplayFrameType.Depth: //... break; case DisplayFrameType.BodyMask: //... break;case DisplayFrameType.BodyJoints:// instantiate a new Canvasthis.drawingCanvas = new Canvas();// set the clip rectangle to prevent// rendering outside the canvasthis.drawingCanvas.Clip = new RectangleGeometry();this.drawingCanvas.Clip.Rect = new Rect(0.0, 0.0,this.BodyJointsGrid.Width,this.BodyJointsGrid.Height);this.drawingCanvas.Width = this.BodyJointsGrid.Width;this.drawingCanvas.Height = this.BodyJointsGrid.Height;// reset the body joints gridthis.BodyJointsGrid.Visibility = Visibility.Visible;this.BodyJointsGrid.Children.Clear();// add canvas to DisplayGridthis.BodyJointsGrid.Children.Add(this.drawingCanvas);bodiesManager = new BodiesManager(this.coordinateMapper,this.drawingCanvas,this.kinectSensor.BodyFrameSource.BodyCount);break;default: break; } }The other DisplayFrameTypes set the source of the CurrentDisplayFrame image when they render to the bitmap. Then set up the BodyJointGrid with the custom canvas each time the BodyJoints DispayFrameType is selected (on button press later).
Add the new FrameSourceType when the MultiSourceFrameReader is opened. In the MainPage constructor add the FrameSourceTypes.Body to the following line:
this.multiSourceFrameReader = this.kinectSensor.OpenMultiSourceFrameReader( FrameSourceTypes.Infrared | FrameSourceTypes.Color | FrameSourceTypes.Depth | FrameSourceTypes.BodyIndex| FrameSourceTypes.Body)); - Now the frame variables are initialized, you can setup the logic for the arrival of a frame within the Reader_MultiSourceFrameArrived method.
There is a switch statement here to handle the other frame types.
The body frame is not handled with special types or unsafe code, so it can be disposed of with a regular using pattern.
To do this copy the highlighted code below:
private void Reader_MultiSourceFrameArrived(MultiSourceFrameReader sender, MultiSourceFrameArrivedEventArgs e) { //... // If the Frame has expired by the time we process this event, return. if (multiSourceFrame == null) { return; } DepthFrame depthFrame = null; ColorFrame colorFrame = null; InfraredFrame infraredFrame = null;BodyFrame bodyFrame = null;BodyIndexFrame bodyIndexFrame = null; IBuffer depthFrameData = null; //... switch (currentDisplayFrameType) { case DisplayFrameType.Infrared: using (infraredFrame = multiSourceFrame.InfraredFrameReference.AcquireFrame()) //... break; case DisplayFrameType.Color: using (colorFrame = multiSourceFrame.ColorFrameReference.AcquireFrame()) //... break; case DisplayFrameType.Depth: using (depthFrame = multiSourceFrame.DepthFrameReference.AcquireFrame()) //... break; case DisplayFrameType.BodyMask: //... break;case DisplayFrameType.BodyJoints:using (bodyFrame =multiSourceFrame.BodyFrameReference.AcquireFrame()){ShowBodyJoints(bodyFrame);}break;default: break; } } -
Finally, create the ShowBodyJoints () method. Add it in MainPage above the other Show***Frame() methods. In ShowBodyJoints() the body data is retrieved and stored in the Body array. The Body array is passed to the bodiesManager, which maps the joints and draws the body to the canvas in UpdateBodiesAndEdges():
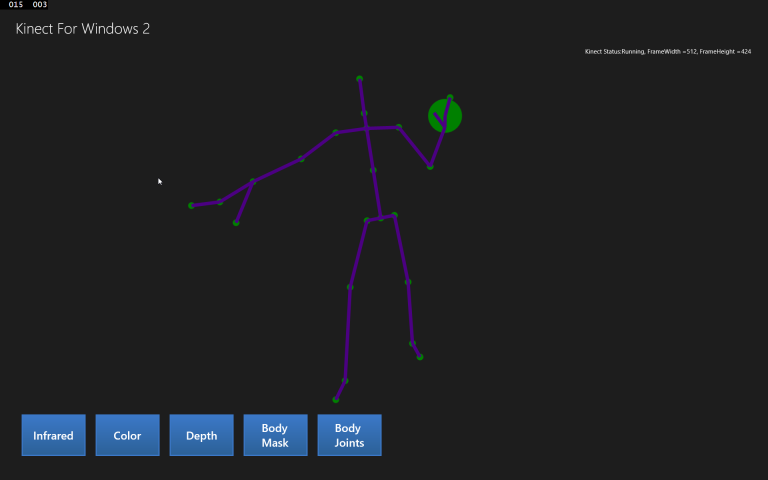
private void ShowBodyJoints(BodyFrame bodyFrame){Body[] bodies = new Body[this.kinectSensor.BodyFrameSource.BodyCount];bool dataReceived = false;if (bodyFrame != null){bodyFrame.GetAndRefreshBodyData(bodies);dataReceived = true;}if (dataReceived){this.bodiesManager.UpdateBodiesAndEdges(bodies);}}If you want to manipulate joints in another way (other than showing the skeleton), then you can implement a method similar to the UpdateBodiesAndEdges method within the BodiesManager. The drawing of each skeleton with the bodies manager is accomplished as follows: Each joint is a small ellipse, each bone is a line between ellipses, each separate body has different color lines. If any joint extends outside the edge of the cameras view, there is a rectangle drawn on that side. If a hand joint is detected as open then it is displayed as a Green ellipse, and if a hand is closed it is displayed as a Red ellipse. All 25 joints in the body are tracked. If some joints are uncertain, they are called inferred joints, and they are drawn with a smaller circle and a thin line as the bone.
- Add a button to turn on the Body Joints. Open the MainPage.xaml and add a new button called Body Joints, with a click event:
<ScrollViewer Grid.Row="2" ScrollViewer.HorizontalScrollBarVisibility="Auto" ScrollViewer.VerticalScrollBarVisibility="Auto"> <StackPanel Orientation="Horizontal"> <Button Content="Infrared" Style="{StaticResource FrameSelectorButtonStyle}" Click="InfraredButton_Click"/> <Button Content="Color" Style="{StaticResource FrameSelectorButtonStyle}" Click="ColorButton_Click"/> <Button Content="Depth" Style="{StaticResource FrameSelectorButtonStyle}" Click="DepthButton_Click"/> <Button Style="{StaticResource FrameSelectorButtonStyle}" Click="BodyMaskButton_Click"> <TextBlock Text="Body Mask" TextWrapping="Wrap"/> </Button><Button Style="{StaticResource FrameSelectorButtonStyle}"Click="BodyJointsButton_Click"><TextBlock Text="Body Joints" TextWrapping="Wrap"/></Button></StackPanel> </ScrollViewer>Then open the code behind file: MainPage.xaml.cs and add the BodyJointsButton_Click method:
private void BodyJointsButton_Click(object sender, RoutedEventArgs e){SetupCurrentDisplay(DisplayFrameType.BodyJoints);} -
Build and Run the application. Click the Body Joints button and stand up so the Kinect 2 can recognize your whole body, and your joints will be displayed!
<!--...--> <Image x:Name="FrameDisplayImage" Grid.Row="1" Stretch="Uniform"/><Viewbox Grid.Row="1" HorizontalAlignment="Center"><Grid x:Name="BodyJointsGrid" Background="Transparent" Width="512"Height="414"/></Viewbox><!--...-->
Summary
This lab taught you how to retrieve and use the Body Frame and others from the MultiSourceFrameReader, and use that frame data to draw shapes on a canvas representing joints.
There are many joints in the body (25!) but the most useful ones for interactions are the hands. With Kinect 2 the hands have three points, the wrist, the tip and the radial, or thumb. With these three points Kinect is able to detect an open or closed hand which is very useful for gestures. There is another gesture called “lasso” which is like the fingers pointing a gun shape which can also be detected as a gesture.
In the next lab, you will use existing feeds to remove the background of a scene.
There is code available for the completed solution from this lab. The next lab will begin from this code.